 If you are here, then you probably already have an idea of what wood floor cupping is. Chances are, though, you are either wanting to learn more or are trying to figure out what to do now that you are faced with a problem. Wood floor cupping is a scary concept for almost everyone. A home-owner who has recently installed beautiful new floors into their home, only to discover 4 months later that their wood floor is starting to look strange will be afraid that their money has been ill spent. An installer will be afraid that a cupping floor could result in a black mark against their reputation or, worse, a lawsuit.
Floor cupping is tricky. It can be caused by a number of factors. Some are the responsibility of the manufacturer, some the installer, and some the owner. When you factor in the many causes alongside the many fears, it can be difficult to get a straight answer. When an issue arises, often you will find that everyone just points to something someone else could have done to cause the issue, so that they are not left holding the hot-potato.
Even worse, when a problem surfaces (literally) the first impulse is to fix it… and FAST! If we let our knee-jerk reaction take over and treat the symptom without understanding the real problem, then we can turn a fixable issue into a completely destroyed floor. Instead, let’s take a moment to study and understand what the actual problem is. Then we’ll explore some steps that can be used to limit the chances of wood floor cupping up front and possibly reverse wood floor cupping on the back end.
___
What is wood floor cupping?
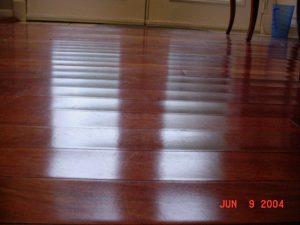
credit: austinfloorguy.com
The simplest way to think of wood floor cupping is to imagine the edges of each plank sticking up higher than the centers. It ends up looking a little like an accordion. If you imagine a picture of a child drawing a boat in the water, then the water will give you a good idea of what a cupped floor looks like.
Any wood floor can suffer from cupping. The problem basically comes from an unavoidable fact: wood floors were once trees. Take a minute to think of a tree. You’ll picture a big trunk, some limbs sticking out, and some leaves on the branches. You might picture a tire swing. (I did.) You might also picture some gnarly roots digging in and out of the ground. All of these things (except the tire swing) factor into wood floor cupping.
Trees do not stay the same shape as they grow. They move and twist. They grow new branches which bend and split into other branches. All of this creates pathways between the solid layers for the tree to pull moisture up through the roots and get it to the leaves. You’ll recognize this as wood grain. Wood grain is what makes a hardwood floor beautiful. But we only see the stark grains. Beyond your ability to see, each piece of wood has super tiny grain that crisscrosses through the plank. This property is what makes a wood floor susceptible to cupping.
___
Why do wood floors cup?

Available at partypalooza.com!
The short answer is: wood is made of fibers, fibers absorb water, and water takes up space.
Do you remember those cool sponge capsules that you used to play with as a kid? You drop them into a glass of water and then stir it with a spoon. In a few minutes… POOF! You had little sponge animals (which you left laying all over until your mom threw them away.)
Hopefully, you realize by now that these little sponge toys are not powered by some mysterious voodoo magic. In fact, the water simply dissolves the capsule and the fibers of the sponge soak up the water to inflate the animal.
Now imagine what would happen if you removed half of the dissolvable capsule. The exposed end would go ahead and start to puff up, while the protected end would still be dry and maintain its shape inside the capsule. If you take this a step farther and imagine that the capsule is a beautiful aluminum-oxide finish, you can start to see a result that will look similar to a cupped plank of wood. This is, of course, a drastic version of what is happening in a cupping wood floor, but the principle still holds true.
All wood (even wood which has been planked, milled, sanded, and finished) absorbs and releases moisture. As with anything in nature, wood has no need to expand and contract evenly. Instead, the edges swell more quickly than the center (being more exposed and having less structural support). What would that start to look like?
___
Here’s how it works:
Moisture affects solid wood floors and engineered wood floors in slightly difference ways. In fact, in some cases exact OPPOSITE situations create wood floor cupping in a solid versus an engineered. Wood Floor Business has a great article that breaks down the difference, which you can read by clicking here. Basically, the way it all happens is controlled by how the world works.
If you are from anywhere in the southern or southeastern United States, then you are well aware of what humidity is (bless your heart.) In case you’re from the moon, humidity is simply a measure of how much water vapor is in the air. You can probably imagine that pouring a bucket of water onto a wood floor would have an effect on it. What you might not think about is the fact that the relative humidity of the air is doing just that (exposing your floor to water) albeit much much more slowly. The water molecules in the air, however, are still just tiny tiny tiny water drops.
Wood wants to play nicely with water. So, given time, it will reach equilibrium with the outside world. In loose terms, you can think of this like water pressure. If there is more in the air than the wood, the wood will absorb. If there is more in the wood, the wood will shed water and dry. As this happens, we have to remember an important point which was made earlier: water takes up space.
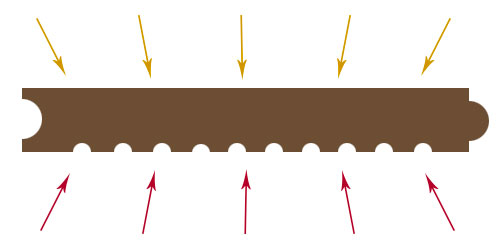
The top and the bottom of each flooring plank is experiencing a different environment. Your living room probably does not feel exactly like the crawl space under your house. The water leaking out of the air in your home happens at a different rate than the water leaking out of the concrete slab over which your floor is laying. Your cute little adorable son spills some water, which of course is wiped up but not before some leaks down below the floor boards and starts looking for somewhere to go. The pipes that carry your hot water change in temperature as you run yourself a super-deep bubble bath. Any and all of these can put you at risk for wood floor cupping.
It is this discrepancy that causes the floor to begin to expand across the bottom, which creates a curl in the wood. When this happens on a large scale… you are now looking over a cupped wood floor.
___
I understand, but how do I stop this menace?!
If you are thinking of installing a new floor and are hoping to avoid the disaster of floor cupping, the Impressions Hardwood Collection has developed a few options which might be of interest. What makes the Piedmont, Nantucket, and Hampton series unique is their moisture resistance. Each of these lines have been treated with an exclusive Six Side Seal© technology that greatly decreases their reaction to moisture. While this does not completely remove the possibility of moisture related issues, it does greatly reduce the chances of problems like floor cupping. These products are especially valuable in situations where the environment is less than ideal for a hardwood floor where another floor would have no chance of success at all.
Each of these series is available in a variety of colors. Obviously, this is a very good thing as it still presents a wide range of looks while protecting against the perils of a moisture imbalanced environment.
___
How do I keep the floor I’ve already chosen from cupping once it is installed?
Having an installer who is familiar with your area is an important first step. While your brother may be very handy with a circular saw, a professional installer has a much greater wealth of experience. Installers are also much more interested in making sure the job does not fall back onto them, if they install the floor incorrectly. It is important to note that not all installers are equal. While price should definitely be a consideration, speak with your retailer to get some suggestions on proven, qualified professionals in your area.
It is also vitally important that the floor be allowed to acclimate to the specific conditions of your home. You can learn more about acclimation here.
___
That’s just great, but my cupped floor is already installed. What now?
If you find yourself dealing with a recently installed floor, buying a new one may not be the best choice. In these cases, there are still options. Keep in mind that these options all require time and patience.
In many cases of slight to moderate wood floor cupping, eliminating the source of the water and drying out the flooring can save the floor. As noted previously, moisture movement within wood can be slow. Just running a fan or dehumidifier for a week will not solve most problems. As in a dry kiln, a combination of heat, air movement and low humidity is the most effective way to dry wood. Commercial drying services that utilize large external dehumidifiers or mats to draw air through the floor may be available. With active measures, it can take a significant amount of time to dry a floor. Without active measures, it can take months. As mentioned earlier, floor finish slows the drying process (see the NWFA “Technical Manual C200: Problems, Causes and Cures”).
Once you’ve gotten your floor back to equilibrium, you’ll need to take steps to keep the same thing from happening in the future. Controlling the climate of the crawl space beneath your home may be required to prevent future issues. You may need to adjust how often you run your AC or heating unit. If this is happening in a vacation home, you may find that you need to run your central air even when you are not staying in the home.
___
Can I just sand it down flat?
In a few words… think very very very very very carefully before you decide to sand down a cupped floor. As we’ve learned, wood floor cupping is caused by the expansion of the floor planks due to moisture. What happens when that moisture releases from the floor and it returns to its original state?

Sanding a cupped floor flat before it is brought to a normal moisture content can eventually result in a crowned floor (convex surface) once the drying process is complete. At this point, the floor may now be ruined and need to be replaced. Wet floors should not be sanded flat until the drying process is completed.
If you have additional questions or concerns, our professionals are available to help. Call our toll-free line at 866-722-4IHC or drop us an email at info@impressionsflooring.com. In addition to these options, feel free to Ask Our Experts.

